这也算是我写的第二篇长篇笔记了
学习包含react18-+,后面代码部分多以react18方式书写
适合:初学 React
1. 安装使用
1.1 基本使用
<body>
  <div id="test"></div>
  <!-- 以下两个包的顺序固定 -->
  <script crossorigin src="https://unpkg.com/react@16/umd/react.development.js"></script>
  <script crossorigin src="https://unpkg.com/react-dom@16/umd/react-dom.development.js"></script>
  <!-- 用于解析 jsx 语法 -->
  <script type="text/javascript" src="../js/babel.min.js"></script>
  <!--type 必须是 text/babel -->
  <script type="text/babel">
    //1. jsx 语法
    const VDOM = <h1>hellore</h1>
    //2. 绑定虚拟 dom 到真实 dom
    ReactDOM.render(VDOM, document.getElementById('test'))
  </script>
</body>
- 再次使用
ReactDOM.render(VDOM, document.getElementById('test')) 会覆盖前面绑定的内容
- react.development.js 和 react-dom.development.js 顺序不能颠倒
1.2 不用 jsx 也能创建虚拟 DOM
const VDOM = React.creatElment('span',{id:'test'},'hello')
ReactDOM.render(VDOM, document.getElementById('test'))
1.3 JSX 语法规则
- 定义虚拟 DOM 不要引号
- 混入 JS 表达式 要用 { }
- 样式类名不能用 class 要用 className (为了防止于类关键字冲突)
- 内联样式格式
style={{ key: value }},多个单词组成的 key 要写成 小驼峰形式
- 只有一个根标签
- 标签必须闭合
- 标签首字母
- 如果首字母小写,会转换为 HTML 标签,如果不存在则报错
- 如果首字母大写,会渲染对应 React 组件,如果不存在则报错
const data = 'hello'
		//jsx 语法
		const VDOM = (
			<div>
				<h1 className='title'>
					<span style={{ color: 'red' }}>{data}</span>
				</h1>
				<input type="text" />
			</div>

		)
//绑定虚拟 dom 到真实 dom
ReactDOM.render(VDOM, document.getElementById('test'))
1.4 JSX 语法注意事项
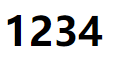
- 当在虚拟 DOM 中插入可迭代对象时,React 会自动遍历
const arr = [1, 2, 3, 4]
		//jsx 语法
		const VDOM = (
			<div>
				<h1>{arr}</h1>
			</div>
		)
ReactDOM.render(VDOM, document.getElementById('App'))
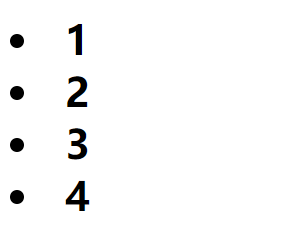
- 如果需要额外处理,用 .map
const arr = [1, 2, 3, 4]
//jsx 语法
const VDOM = (
	<div>
		<h1>
			{
				arr.map((item, index) => {
					return <li key={index}>{item}</li>
				})
			}
		</h1>
	</div>
)
//绑定虚拟 dom 到真实 dom
ReactDOM.render(VDOM, document.getElementById('App'))
2. 组件
2.1 函数式组件
- 绑定得用 形式
- 类中的 this 指向 undefined
function Mycomponent () {
	console.log(this) //undefined 因为babel启用了严格模式
	return <h1>函数式组件</h1>
}
//绑定虚拟 dom 到真实 dom
ReactDOM.render(<Mycomponent />, document.getElementById('App'))
函数组件使用 state 和 ref 要借助了两个钩子 useState 与 useRef
import React, { useState, useRef } from 'react'
export default function Count () {
	const [count, setCount] = useState(0)
	const slt = useRef()
	const add = () => {
		setCount(count + slt.current.value * 1)
	}
	return (
		<div>
			<h1>Count: {count}</h1>
			<select ref={slt}>
				<option value="1">1</option>
			</select>
			<button onClick={add}>add</button>
		</div>
	)
}
2.2 类式组件
- 绑定得用 形式
- 类中的 this 指向组件实例对象
- 固定写法如下
class Mycomponent extends React.Component {
	render () {
		return (
			<div>
				<span>类组件</span>
			</div>
		)
	}
}
ReactDOM.render(<Mycomponent />, document.getElementById('App'))
2.3 state
class Mycomponent extends React.Component {
	constructor(props) {
		super(props)
		this.state = { isHot: true } //初始化 state
	}
	render () {
		const { isHot } = this.state
		return (
			<div>
				<span>天气{isHot ? '炎热' : '寒冷'}</span>
			</div>
		)
	}
}
//绑定虚拟 dom 到真实 dom
ReactDOM.render(<Mycomponent />, document.getElementById('App'))
2.3.1 事件绑定修改state
React 推荐用内联方式绑定
- 第一种写法(开发中肯定不能这么写)
class Mycomponent extends React.Component {
	constructor(props) {
		super(props)
		this.state = { isHot: true }
	}
	render () {
		const { isHot } = this.state
		return (
			<div>
				<span onClick={demo}>天气{isHot ? '炎热' : '寒冷'}</span>
			</div>
		)
	}
}
function demo () {
	console.log('点击');
}
ReactDOM.render(<Mycomponent />, document.getElementById('App'))
- 第二种写法:我们希望将 demo 方法拿到 Mycomponent 类里面去,但是 函数中的 this 指向会产生问题
class Mycomponent extends React.Component {
	constructor(props) {
		super(props)
		this.state = { isHot: 1 }
	}
	render () {
		const { isHot } = this.state
		return (
			<div>
				<span onClick={this.demo}>天气{isHot ? '炎热' : '寒冷'}</span>
			</div>
		)
	}
	demo(){
		console.log(this) //undefined
	}
}
ReactDOM.render(<Mycomponent />, document.getElementById('App'))
Mycomponent 是一个类,onClick 在绑定事件时候并不是用类的实例对象调用 demo ,所以 this 会指向 undefined(因为类中默认开启了严格模式),他的调用方式类似
let x = new Mycomponent()
let y = x.demo
y()//此时this指向会有问题
解决办法: constructor 函数中添加 this.demo = this.demo.bind(this)
this.demo.bind(this) 会返回一个 this 指向为实例对象的函数
class Mycomponent extends React.Component {
	constructor(props) {
		super(props)
		this.state = { isHot: true }
    //this.demo方法会在原型上找到,并返回一个内部 this 指向组件实例对象的方法,
    //并赋值给组件实例对象的新属性demo
		this.demo = this.demo.bind(this)
	}
	render () {
		const { isHot } = this.state
		return (
			<div>
				<span onClick={this.demo}>天气{isHot ? '炎热' : '寒冷'}</span>
			</div>
		)
	}
  //demo会放在Mycomponent的原型对象上供实例使用
	demo(){
		console.log(this) //
	}
}
ReactDOM.render(<Mycomponent />, document.getElementById('App'))
2.3.2 setState 修改 State
- setState() 修改 state 是合并 state ,不是覆盖
class Mycomponent extends React.Component {
	constructor(props) {
		super(props)
		this.state = { isHot: true }
		this.demo = this.change.bind(this)
	}
	render () {
		const { isHot } = this.state
		return (
			<div>
				<span onClick={this.demo}>天气{isHot ? '炎热' : '寒冷'}</span>
			</div>
		)
	}
	change () {
		//这样直接修改,state确实变了,但是页面不会触发更新
		//this.state.isHot = !this.state.isHot
		//要使用内置的setState()函数来修改state
		this.setState({
			isHot: !this.state.isHot
		})
		console.log(this.state.isHot)
	}
}
ReactDOM.render(<Mycomponent />, document.getElementById('App'))
- setState 的完整用法
import React, { Component } from 'react'

export default class Demo extends Component {
	state = { count: 0 }
	/* 第一种对象式,本质是函数式的语法糖 */
	add = () => {
		/*
				setState() 确实是同步方法,但是 react 的更新状态是异步的
				第二个参数是个回调,是当 react 更新状态后调用的
		*/
		this.setState({ count: this.state.count + 1 }, () => console.log(this.state.count)) // 1
		console.log(this.state.count) // 0
	}
	/* 第一种函数式 */
	add2 = () => {
		/* 第一个回调能接收到 state 和 props ,第二个回调是当 react 更新状态后调用的*/
		this.setState((state, props) => { }, () => { })
	}
	render () {
		return (
			<div>
				<h1>count: {this.state.count}</h1>
				<button onClick={this.add}>ADD</button>
			</div>
		)
	}
}
这里便和函数式组件用 state 有区别
比如 const [state, setState] = useState({ count: 0 })
这里 setState 是同步的,更新状态也是同步的
2.3.3 state 简写方式 (开发写法)
由于之前的那样写是因为在类中直接定义方法,方法会被放在类的原型上,所以在绑定事件触发时候, this 指向会是 undefined 。所以需要在构造函数中this.demo = this.change.bind(this) 之类的代码来给组件实例对象属性上赋一个拥有正确 this 的函数。
那我们何不直接给组件实例对象添加呢?所有有以下写法。
那么当触发事件时候就是由实例来触发了
class Mycomponent extends React.Component {
	//state 初始化也直接写
	state = {
		isHot: true
	}
	render () {
		const { isHot } = this.state
		return (
			<div>
				<span onClick={this.change}>天气{isHot ? '炎热' : '寒冷'}</span>
			</div>
		)
	}
	//必须用箭头函数,不然 this 指向会出错
	change = () => {
		this.setState({
			isHot: !this.state.isHot
		})
	}
}
ReactDOM.render(<Mycomponent />, document.getElementById('App'))
this.setState({ }) 并不会把状态清空,而是相当于 this.setState(state)
2.4 props
2.4.1 props 介绍
- 用于外部数据传输至组件内
- 只读不可修改
- 组件传递的props,构造函数都能接到
constructor(p) {
  super(p)
	console.log(p === this.props); // ture
}
2.4.2 props 的基本使用
class Mycomponent extends React.Component {
	render () {
		const { name, age, address } = this.props
		return (
			<ul>
				<li>{name}</li>
				<li>{age}</li>
				<li>{address}</li>
			</ul>
		)
	}
}
ReactDOM.render(<Mycomponent name='Tom' age='29' address='xxx' />, document.getElementById('App'))
ReactDOM.render(<Mycomponent name='Jack' age='19' address='xxx' />, document.getElementById('App2'))
ReactDOM.render(<Mycomponent name='Xz' age='9' address='xxx' />, document.getElementById('App3'))
2.4.3 批量传递 props
class Mycomponent extends React.Component {
	render () {
		const { name, age, address } = this.props
		return (
			<ul>
				<li>{name}</li>
				<li>{age}</li>
				<li>{address}</li>
			</ul>
		)
	}
}
//--
const obj = {
	name: 'Tom',
	age: 18,
	address: 'xxxxx'
}
//--
ReactDOM.render(<Mycomponent {...obj} />, document.getElementById('App'))
注意 ❗❗❗
展开运算符 ... 并不能展开对象,此处组件中的 {...obj} 是 React 提供的语法糖,{ } 符号在这里实际只是分隔符的作用,所以本质上 React 在标签中将 ...obj合法化。
- 但是在原生 JS 中
{...obj} 是对对象的浅拷贝 ,详情 https://developer.mozilla.org/zh-CN/docs/Web/JavaScript/Reference/Operators/Spread_syntax
- 可见
...obj 在 JSX 中也只能在组件绑定的标签中用
//在JSX中
let obj = {}
console.log(...obj) //也会报错
2.4.4 约束 props 类型
- 引入新的 js 文件 prop-type.js,引入后全局会多一个 PropTypes 对象用于表示限制类型
- 在传入props 时候采用 { } 语法,如果限定为 number 类型,传入字符串数字也会报错
- 限定函数类型要用 PropTypes.func (为了防止与关键词 function 冲突)
- .isRequired 代表是否必须
<!-- 引入约束 props 的类型包 -->
<script src="https://cdn.bootcdn.net/ajax/libs/prop-types/15.8.1/prop-types.js"></script>
<div id="App"></div>
<script type="text/babel">
	class Mycomponent extends React.Component {
		render () {
			const { name, age, address } = this.props
			return (
				<ul>
					<li>{name}</li>
					<li>{age + 1}</li>
					<li>{address}</li>
				</ul>
			)
		}
	}
	//isRequired 代表是否必须
	Mycomponent.propTypes = {
		name: PropTypes.string,
		age: PropTypes.number.isRequired,
    speak: PropTypes.func
	}
	//定义默认属性
	Mycomponent.defaultProps = {
		address: 'defaultAddress'
	}
	function speak () {/* code */ }
	// 传其他类型用{}语法
	ReactDOM.render(<Mycomponent name={'Xz'} age={9} speak={speak} />, document.getElementById('App'))
</script>
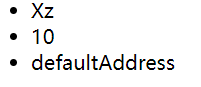
组件的属性叫 proptypes,全局的约束对象是 PropTypes;勿混淆
2.4.5 props 简写
<!-- 引入约束 props 的类型包 -->
<script src="https://cdn.bootcdn.net/ajax/libs/prop-types/15.8.1/prop-types.js"></script>
<div id="App"></div>
<script type="text/babel">
	class Mycomponent extends React.Component {
		//isRequired 代表是否必须
		static propTypes = {
			name: PropTypes.string,
			age: PropTypes.number.isRequired
		}
		//定义默认属性
		static defaultProps = {
			address: 'defaultAddress'
		}
		render () {
			const { name, age, address } = this.props
			return (
				<ul>
					<li>{name}</li>
					<li>{age + 1}</li>
					<li>{address}</li>
				</ul>
			)
		}
	}
	function speak () {/* code */ }
	// 传其他类型用{}语法
	ReactDOM.render(<Mycomponent name={'Xz'} age={9} speak={speak} />, document.getElementById('App'))
</script>
2.4.6 函数式组件用 props
function Mycomponent (props) {
	const { name, age, address } = props
	return (
		<ul>
			<li>{name}</li>
			<li>{age}</li>
			<li>{address}</li>
		</ul>
	)
}
Mycomponent.propTypes = {
	name: PropTypes.string,
	age: PropTypes.number.isRequired
}
Mycomponent.defaultProps = {
	address: 'defaultAddress'
}
ReactDOM.render(<Mycomponent name={'Xz'} age={9} />, document.getElementById('App'))
它用不了 refs 和 state
2.5 refs
2.5.1 描述
2.5.2 字符串形式 ref
官方已经不推荐使用❗
class Mycomponent extends React.Component {
	render () {
		return (
			<div>
				<input type="text" ref='input1' />
				<input type="button" value='输出' ref='btn1' onClick={this.tip} />
				<input type="text" ref='input2' placeholder='失焦输出' onBlur={this.log} />
			</div>
		)
	}
	tip = () => {
		const { input1 } = this.refs
		input1.value = 'ok'
	}
	log = () => {
		console.log('blur')
	}
}
ReactDOM.render(<Mycomponent />, document.getElementById('App'))
2.5.3 回调式 ref
- 内联写法
这样写在页面触发更新时会触发两次,第一次传入的 currentNode 为 null,第二次为当前节点
因为页面触发更新,render 会重新执行,但是此时的 this.input1 任然指向上一次的当前节点,所以为了严谨型 React 会先传个 null 将其执行一次将 this.input1 指向清空。(后面这一句为自己理解,正确性待商榷)
class Mycomponent extends React.Component {
  render () {
    return (
      <div>
      <input type="text" ref={currentNode => this.input1 = currentNode} />
      <input type="button" value='输出' onClick={this.tip} />
  <input type="text" ref={currentNode => this.inpute2 = currentNode} placeholder='失焦输出' onBlur={this.log} />
  </div>
)
}
	tip = () => {
	  const { input1 } = this
	  input1.value = 'ok'
	}
	log = () => {
	  console.log('blur')
	}
}
ReactDOM.render(<Mycomponent />, document.getElementById('App'))
- class 绑定函数写法
不会执行多余次数
class Mycomponent extends React.Component {
	state = {
		size: true
	}
	render () {
		const { size } = this.state
		return (
			<div>
				<h1>-----{size ? '大' : '小'}-----</h1>
				<input type="text" ref={ this.saveInput } />
				<input type="button" value='改' onClick={this.change} />
			</div>
		)
	}
	saveInput = (currentNode) => {
		this.input1 = currentNode
	}
	change = () => {
		this.setState({ size: !this.state.size })
	}
}
ReactDOM.render(<Mycomponent />, document.getElementById('App'))
两种方法都行,执行两次没影响
官网解释https://react.docschina.org/docs/refs-and-the-dom.html
2.5.4 createRef (官方推荐)
class Mycomponent extends React.Component {
	//
	ref1 = React.createRef()
	ref2 = React.createRef()
	render () {
		return (
			<div>
				<input type="text" ref={this.ref1} />
				<input type="button" value='LOG' onClick={this.log} />
				<input type="text" ref={this.ref2} onBlur={this.blur} />
			</div>
		)
	}
	//
	log = () => {
		console.log(this.ref1.current.value)
	}
	blur = () => {
		console.log(this.ref2.current.value)
	}
}
ReactDOM.render(<Mycomponent />, document.getElementById('App'))
2.5.5 事件处理
- React 的 onXxxx 事件是自己封装的,为了更好的兼容性
- React 中的事件处理是通过事件委托的形式委托给最外层元素,为了高效
- 不要过度使用 ref ,如下情况就可以少用 ref
class Mycomponent extends React.Component {
	//
	ref1 = React.createRef()
	render () {
		return (
			<div>
				<input type="text" ref={this.ref1} />
				<input type="button" value='LOG' onClick={this.log} />
				<input type="text" onBlur={this.blur} />
			</div>
		)
	}
	log = () => {
		console.log(this.ref1.current.value)
	}
	//
	blur = (e) => {
		console.log(e.target.value)
	}
}
ReactDOM.render(<Mycomponent />, document.getElementById('App'))
2.6 受控 / 非受控组件
- 非受控组件:现用现取
- 受控组件:改变状态,例如给 input 绑定 onChange 事件来实时改变 state (亦如 Vue 的双向绑定)
2.7 函数柯里化
一个函数接受一个函数作为参数或者返回一个函数,那这个函数就叫高阶函数
函数柯里化即可这样 fun(1)(2)(3) 按层级调用
class Mycomponent extends React.Component {
	state = {
		username: '',
		password: ''
	}
	saveFormData = (dataName) => {
		return (e) => {
			this.setState({[dataName]: e.target.value})
		}
	}
	handleSubmit = (e) => {
		e.target.preventDefault = false //取消默认事件
	}
	render () {
		return (
			<form onSubmit={this.handleSubmit}>
				<input type="text" name='username' onChange={this.saveFormData('username')} />
				<input type="text" name='password' onChange={this.saveFormData('password')} />
				<input type="submit" value='提交' />
			</form>
		)
	}
}
ReactDOM.render(<Mycomponent />, document.getElementById('App'))
onChange 执行的是回调函数
上面这种双向绑定的实现也可以不用函数柯里化
class Mycomponent extends React.Component {
	state = {
		username: '',
		password: ''
	}
  //
	saveFormData = (dataName, e) => {
		this.setState({ [dataName]: e.target.value })
	}
	handleSubmit = (e) => {
		e.target.preventDefault = false
	}
	render () {
		return (
			<form onSubmit={this.handleSubmit}>
				<input type="text" name='username' onChange={e => this.saveFormData('username', e)} />
				<input type="text" name='password' onChange={e => this.saveFormData('password', e)} />
				<input type="submit" value='提交' />
			</form>
		)
	}
}
ReactDOM.render(<Mycomponent />, document.getElementById('App'))
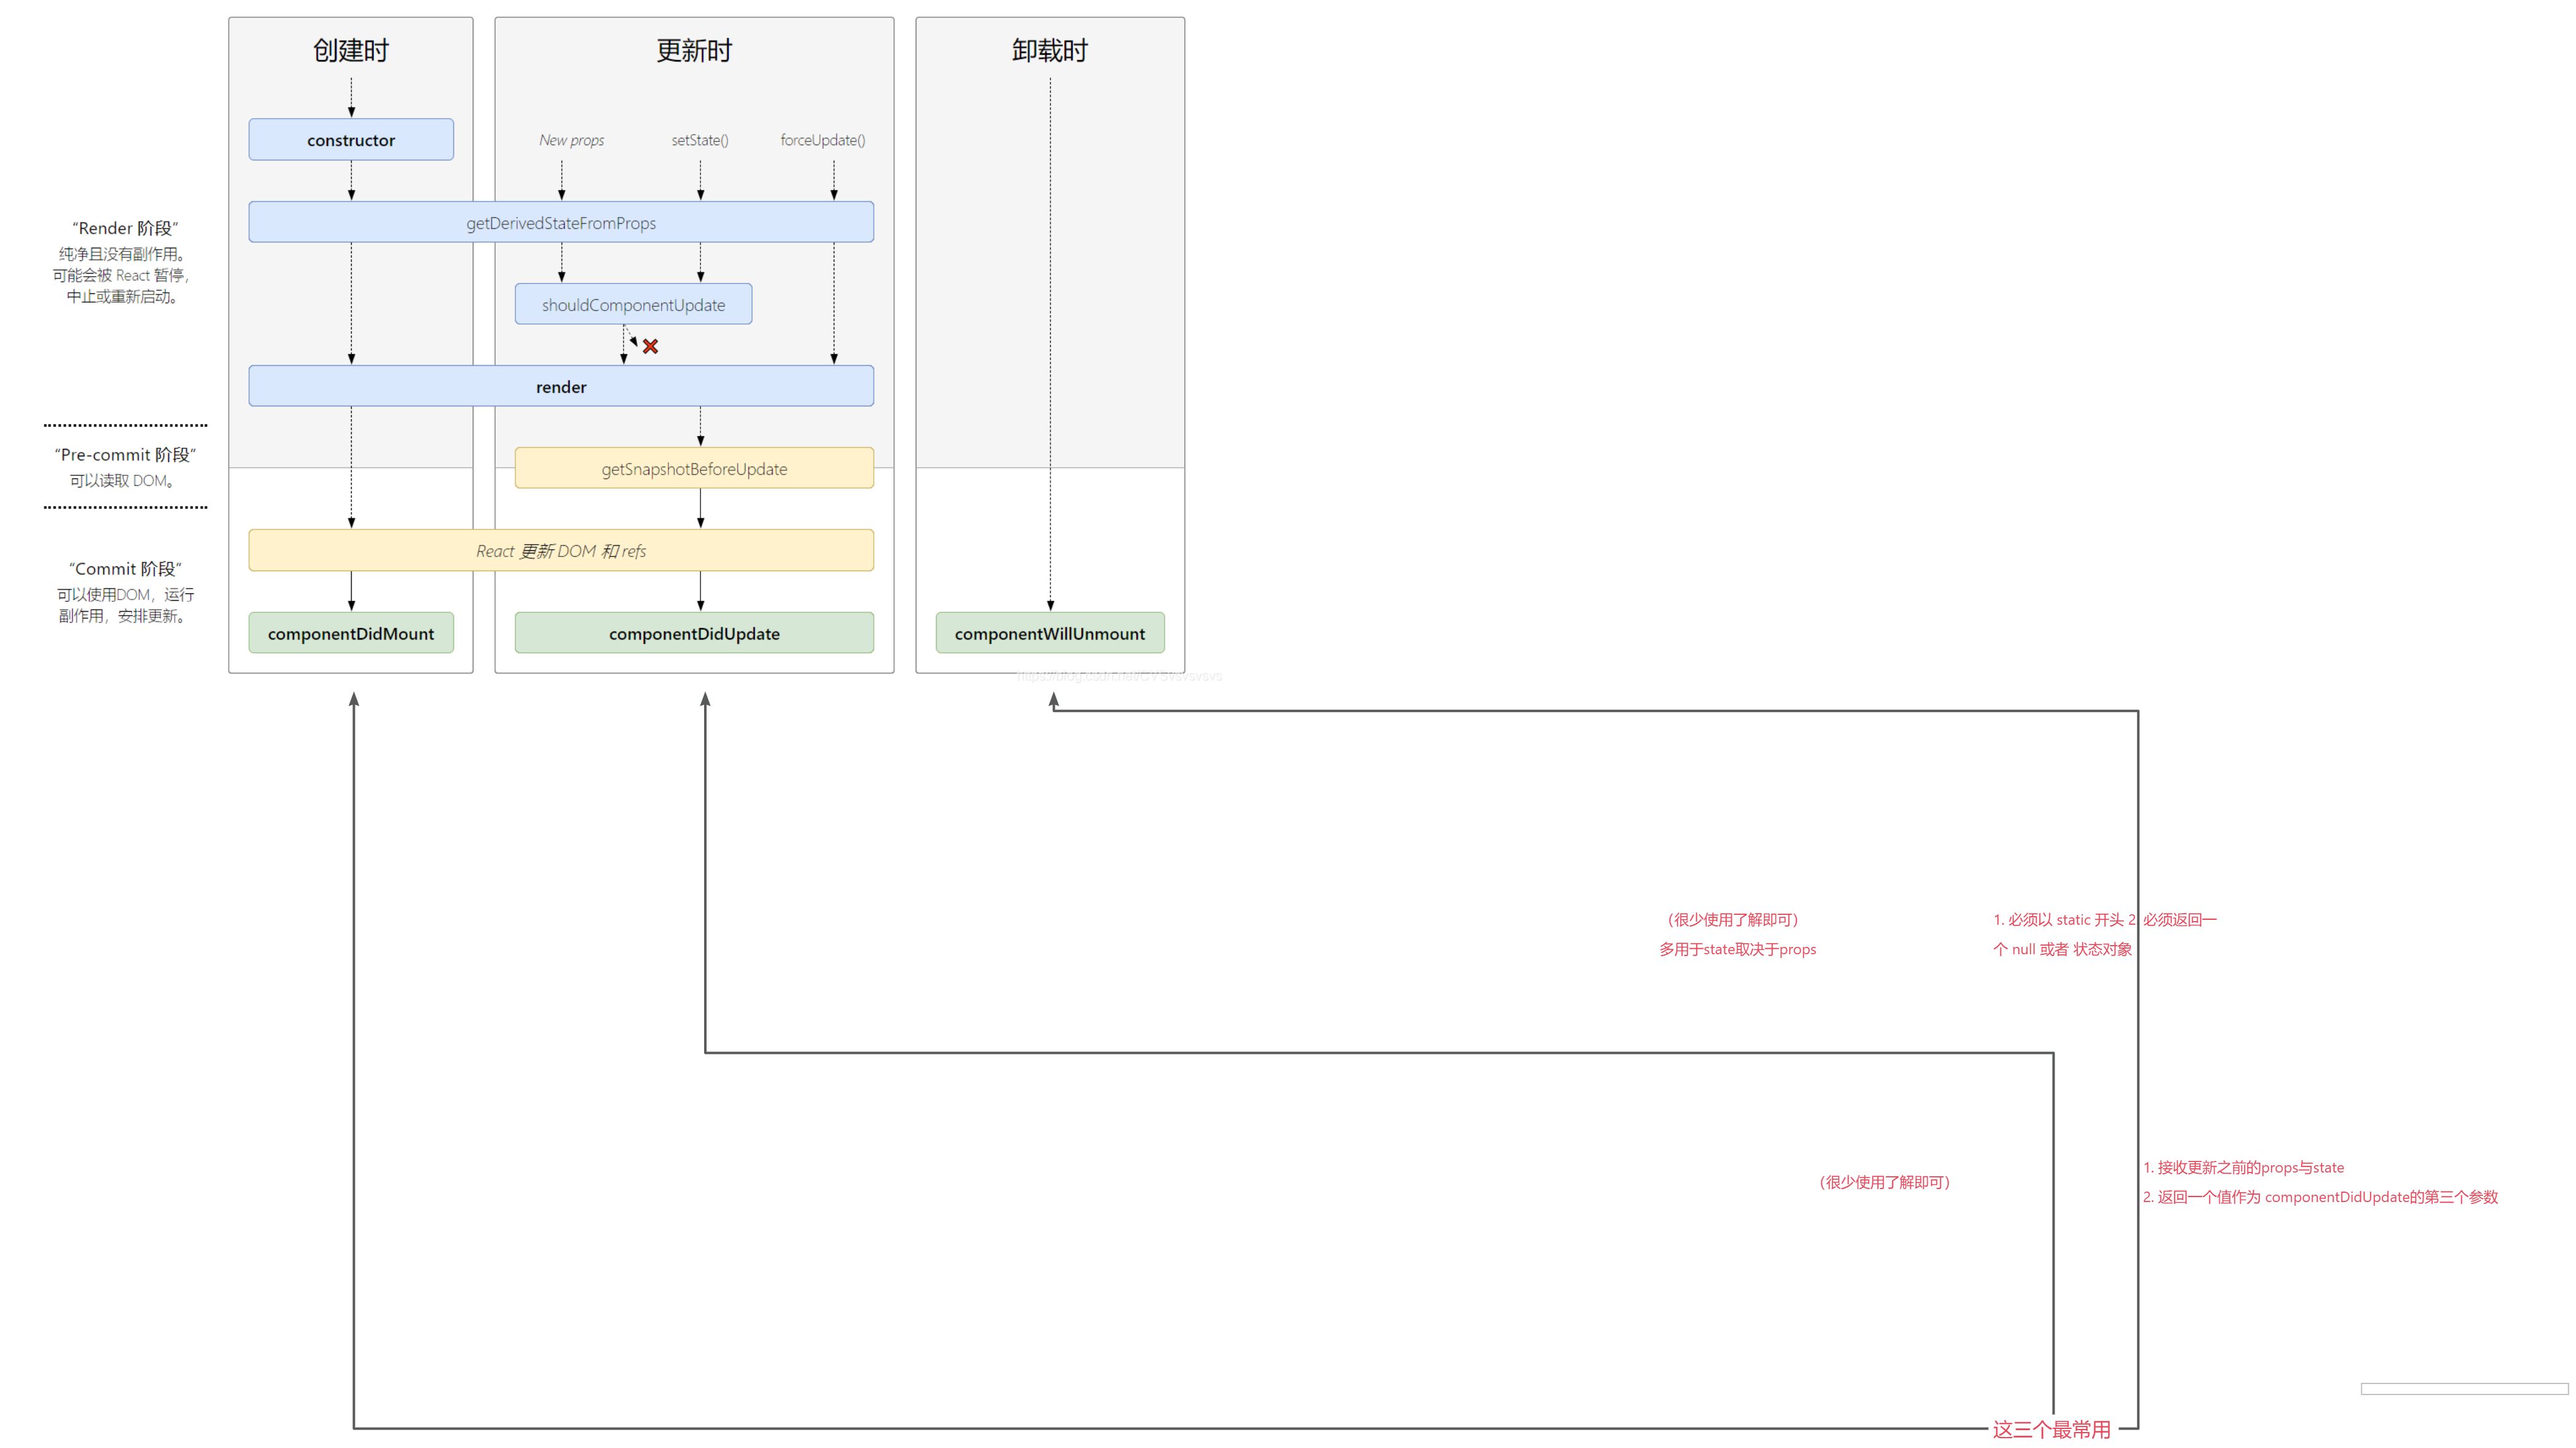
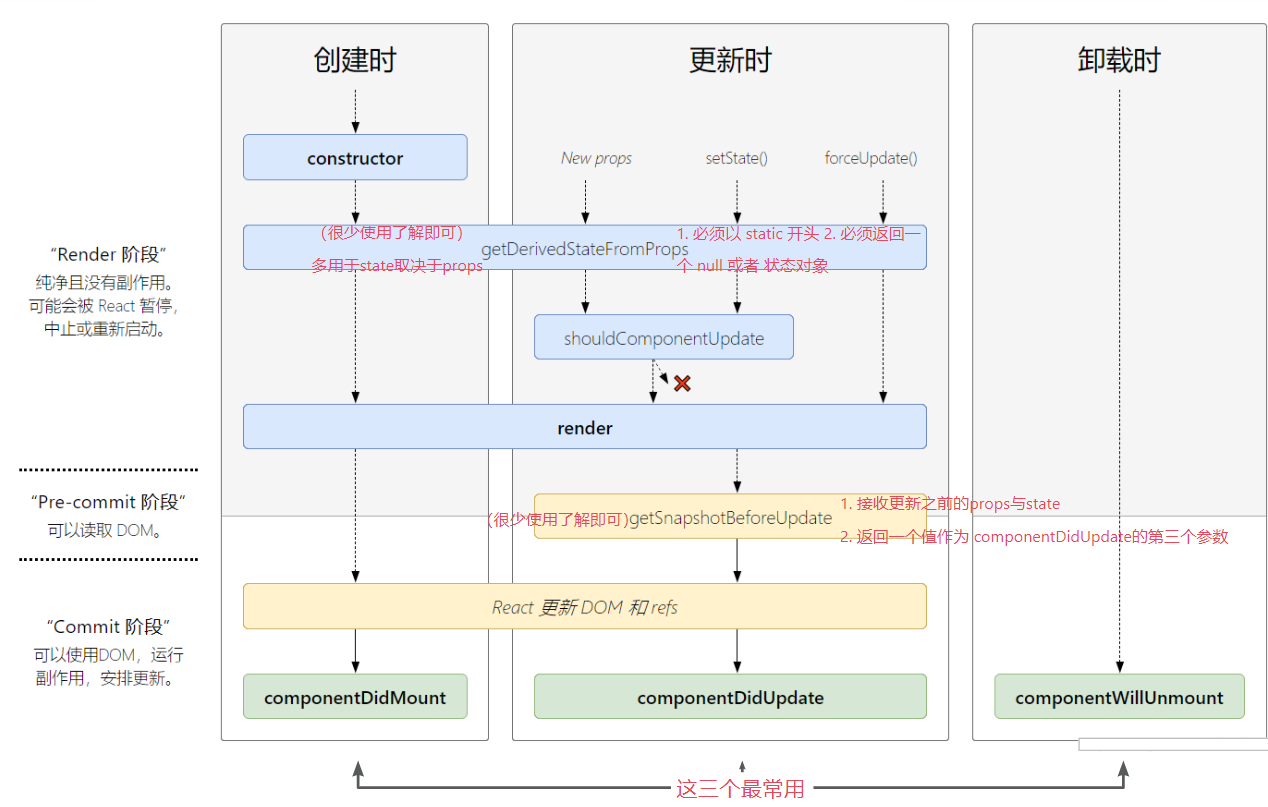
3. 生命周期
4. 遍历时必须给 key 值的原因
4.1 过程
由于diff 算法是通过 key 来更新 DOM 的,过程如下
- 新的数据产生,React 产生新的虚拟 DOM
- 通过 key 与真实 DOM 进行比较 (通过 Diff 算法)
- key 相同:比较内容
- 内容相同:复用原来的真实 DOM
- 内容不同:生成新的真实 DOM 替换掉真实 DOM
- 不存在此 key:生成新的真实 DOM 渲染至页面
4.2 为何不推荐 index 作为 key
- key 重复
- 如果有输入类 DOM ,可能会产生错误效果
- 在列表前添加数据会造成后续数据不复用原来真实 DOM,效率低下
如果上述 DOM 结构中文本发生变化,链接没有变化,那也只有文本更新,a 节点并不会重新渲染
5. 脚手架
5.1 安装使用
- 全局安装脚手架
npm i -g create-react-app
- 在指定目录下创建 react 项目
create-react-app 项目名
- 启动
npm start 或者 yarn start
5.2 目录讲解
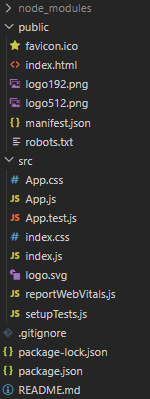
有很多我们不熟悉的文件,但是这些并不是必需的,我们只需要将其精简为
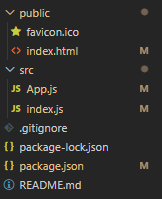
npm eject 暴露所有核心配置文件(不可逆)
5.3 基本写法
入口文件 index.js
import React from 'react';
import ReactDOM from 'react-dom';
import App from './App';

class ROOT extends React.Component {
  render () {
    return (
      <React.StrictMode>
        <App />
      </React.StrictMode>
    )
  }
}
/*
	*React18 已经不在建议采用这种方式渲染至节点了
*/
ReactDOM.render(<ROOT />, window.root)
总组件文件 App.jsx
import Hello from "./components/Hello";
function App () {
  return (
    <div className="App">
      <Hello></Hello>
    </div>
  );
}

export default App;
子组件 Hello.jsx
import React,{Component} from "react"
import './index.css'
export default class Hello extends Component{
  render(){
    return <div>hello world</div>
  }
}
5.4 样式模块化
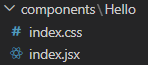
当多个组件都引入自己的 index.css 时候,即使他们不在一个文件夹,也会类名冲突(除非所有类名不同)
当我们在 vue 中时候 只需要在 vue 组件中的 style 标签加上一个 scoped 即可,可是 React 没这么直观
- 方法一:将 index.css 改名为 index.module.css 交由打包工具处理;然后
import React,{Component} from "react"
import style from './index.module.css'
export default class Hello extends Component{
	render(){
		return <div className={style.类名}>hello world</div>
	}
}
- 方法二:用 less 嵌套,使得各个组件中的 index.css 类名不一致
当然也可以头铁把所有类名设置得不一样
6. TodoList案例(父子通信)
具体案例代码https://github.com/xzboss/2023-study/tree/master/React/ReactCli/react_hello
6.1 父传子 用 props
父组件
<MyComponent msg={this.state.data}></MyComponent>
子组件
6.2 子传父 用绑定事件方法
父组件
emit = (option)=>{}
render(){
  return <MyComponent fun={this.emit}></MyComponent>
}
子组件
emit = ()=>{
  this.props.fun(value)
}
render(){
  return <div onClick={this.emit}></div>
}
子组件触发时调用父组件函数,this 指向为父组件原理 在问题文档查找
6.3 关于 checked 与 defaultChecked 属性
6.3.1 checked
在 react 中需要搭配 onChange 使用,不然点不动
构成受控组件
6.3.2 defaultChecked
初始渲染一次默认值,随后修改不起作用
构成非受控组件
7. 配置代理
7.1 在 package.json 中配置(只能配置一个)
首先 react 项目开启在 3000 端口
package.json
{
  "proxy": "http://localhost:5000"
}
server.js
const express = require('express')
const app = express()
app.get('/student', (req, res) => {
	res.send('')
})
app.listen(5000, err => console.log("服务启动成功localhost:5000"))
使用
axios.get("http://localhost:3000/student").then(res => {//code}, err=>{})
7.2 采用配置文件 setupProxy.js (灵活多变)
在 src 下新建 setupProxy.js 文件
const {createProxyMiddleware } = require('http-proxy-middleware')
module.exports = function (app) {
	app.use(
		createProxyMiddleware('/A', { // 触发代理的路径前缀
			target: 'http://localhost:5000',//目标地址
      //是否隐藏自己真实地址(隐藏后后端的Host请求头里就不会是真实请求者的地址了)
			changeOrigin: true,
			pathRewrite: { '^/A': '' } //重写请求地址
		}),
		createProxyMiddleware('/B', {
			target: 'http://localhost:5001',
			changeOrigin: true,
			pathRewrite: { '^/B': '' }
		})
	)
}
server.js
const express = require('express')
const app = express()
app.use((request, response, next) => {
	console.log('Someone has requested the server')
	console.log('The requestor is', request.get('Host'))
	next()
})
app.get('/student', (req, res) => {
	res.send('')
})
app.listen(5000, (err) => { console.log("服务启动成功localhost:5000") })
使用
axios.get("http://localhost:3000/A/student").then(res => {//do something})
服务器控制台

但其实真实请求者为 3000,这就是 changeOrigin 的作用
如果向 3000 端口(react 启动端口)要资源,那么 public 文件夹中没有才会进行转发,因为 public 是默认的服务器根文件夹
8. GitHub 搜索案例 (pub-sub,axios,父子通信,fetch)
具体案例代码https://github.com/xzboss/2023-study/tree/master/React/ReactCli/react_hello
8.1 fetch 与 axios 区别
- axios 与 jQuery 都是对 XMLHttpRequest 对象实例的封装,但是 fetch 不是,他和 XMLHttpRequest 实例对象(也就是平时所说的 xhr)是平级的
- 取得数据方式不同
- axios 取数据
axios.get(url).then(res=>res.data)
2. fetch 的数据并不是返回对象身上的某个属性,它不能直接获得(关注分离的设计思想)
fetch(url).then(res=>res.json())
//得通过json方法返回得到,而json方法也并不是它本身具有的,而是它的原型对象上的
- 执行回调 then 不同
- axios 得到 404 状态会执行失败回调
axios(url).then(
	res => {},
	err => console.log('err')
)
2. fetch 只要联系到服务器就会执行成功回调,不管是否成功获取到数据
fetch(url).then(
	res => console.log('res'),
	err => {}
)
同样是 404 执行却不同
- async awat 与 fetch 一起使用
fun = async()=>{
  try {
		const res = await fetch(`/github/search/users?q=${value}`)
		const data = await res.json()
		console.log(data);
	} catch (error) {
		//..code
	}
}
9. 路由
接下来我就不用类组件的形式了
为了拥抱 hooks ,接下来全部采用函数式组件的写法
可以先划到后面看一下一些常用的 hooks
9.1 简述原理
通过改变地址栏,然后监听到地址栏变化,更新对应组件
9.2 基础使用
- 现在默认已经是 @6 版本了
- react 脚手架默认是没有这个包的
App.jsx
import React from 'react'
import Header from './component/Header'
import { Routes, Route, NavLink } from 'react-router-dom'
import About from './page/About'
import Home from './page/Home'
export default function App () {
  return (
    <div className="container">
      <div className="row">
        <Header />
      </div>
      <hr />
      <div className="row">
        <div className='list-group col-4'>
          <NavLink className='list-group-item' to='/about'>to About</NavLink>
          <NavLink className='list-group-item' to='/home'>to Home</NavLink>
        </div>
        <div className='col-8'>
          <Routes>
            <Route path="/about" element={<About />} />
            <Route path="/home" element={<Home />} />
          </Routes>
        </div>
      </div>
    </div>
  )
}
index.js
import React from 'react';
import ReactDOM from 'react-dom';
import App from './App';
import { BrowserRouter } from 'react-router-dom';
class ROOT extends React.Component {
  render () {
    return (
      <React.StrictMode>
        <App />
      </React.StrictMode>
    )
  }
}
ReactDOM.render(
  <BrowserRouter>
    <ROOT />
  </BrowserRouter>
  , window.root)
效果

注意事项
- 有路由组件的组件必须被 BrowerRoute 组件或者 HashRoute 组件所包裹,但是路由组件经常使用,所以索性就把 Root 组件全部包裹起来
- 路由注册组件 必须被包裹在 Routes 组件里 (用处就是当匹配到正确路由后便不再继续往下匹配,但是不写会出错,从以前的 Switch 组件包裹变成必须 Routes 组件包裹)
9.3 重定向
<Routes>
	<Route path="/about" element={<About />} />
  <Route path="/home" element={<Home />} />
  <Route path='/' element={<Navigate to="/about" />} />
</Routes>
<div>
	<h1>About</h1>
	{sum > 5 ? <Navigate to='/home' /> : <h3>{sum}</h3>}
	<button onClick={add}>+1</button>
</div>
Navigate 组件只要一渲染便会引起地址栏改变
9.4 小知识
- Link 组件默认是 push 操作,改为 replace :
<Link replace>xxx</Link>
- 路由匹配默认不区分大小写
<Link to='/aBOUt'>to About</Link>
<Routes>
  <Route path="/about" element={<About />} />
</Routes>
这样也能匹配 ,若想区分大小写 <Route path="/about" caseSensitive element={<About />} />
- 解决样式丢失问题
- 在 public/index.html 中引入资源:例如
<link rel="stylesheet" href="./boot.min.css">,刚开始能正确引用,但是当路由切换后 比如现在路由切换到 8080/home/user ,这时刷新页面,那请求样式资源路径将变成 8080/home/boot.min.css,自然是错误的
- 解决办法:
<link rel="stylesheet" href="/boot.min.css"><link rel="stylesheet" href="%PUBLIC_URL%/boot.min.css">
9.5 NavLink 选中高亮
9.5.1 其实也就是当选中时 react 给他加类名
const changeClassName = ({ isActive }) => {
  return 'list-group-item ' + (isActive ? 'active' : '')
}
...
<NavLink className={changeClassName} to='/about'>to About</NavLink>
默认传参是一个对象,对象身上有个属性 isActive 表示是否选中
父组件 NavLink 添加 end 属性 那么子组件被选手中便会取消父组件被选中效果


9.5.2 封装 NavLink
MyNavLink
import React from 'react'
import { NavLink } from 'react-router-dom'
export default function MyNavLink (props) {
	console.log(props)// prop有一个children属性带着标签内容
	const changeClassName = ({ isActive }) => {
		return 'list-group-item ' + (isActive ? 'active' : '')
	}
	return (
		<NavLink className={changeClassName} {...props} />
	)
}
使用 to Home 会在 props.children 被接收到,NavLink 组件指定了 children 属性,那便就相当于写了 <NavLink>{props.children}</NavLink>
<NavLink className={changeClassName} to='/about'>to About</NavLink>
<NavLink className={changeClassName} to='/home'>to Home</NavLink>
<MyNavLink to='/home'>to Home</MyNavLink>
9.6 路由表 useRoutes()
src/routes/index.js
import { Navigate } from "react-router-dom"
import About from "../page/About"
import Home from "../page/Home"
const routes = [
  {
    path: '/about',
    element: <About />
  },
  {
    path: '/home',
    element: <Home />
  },
  {
    path: '/',
    element: <Navigate to='/about' />
  }
]
export default routes
App.jsx
import React from 'react'
import { NavLink, useRoutes } from 'react-router-dom'
import routes from './routes'
export default function App () {
  //根据路由表生成对应路由规则
  const elements = useRoutes(routes)
  return (
    <div className="container">
      <div className='list-group col-4'>
        <NavLink className={changeClassName} to='/about'>to About</NavLink>
        <NavLink className={changeClassName} to='/home'>to Home</NavLink>
      </div>
      <div className='col-8'>
        {/*注册路由*/}
        {elements}
      </div>
    </div>
  )
}
9.7 嵌套路由
routes/index.js
import Home from "../page/Home"
import News from "../page/Home/News"
import Message from "../page/Home/Message"
const routes = [
	{
		path: '/home',
		element: <Home />,
		children: [
			{
				path: 'news',
				element: <News />
			},
			{
				path: 'message',
				element: <Message />
			}
		]
	},
]
export default routes
Home.jsx
import React from 'react'
import { NavLink, Outlet } from 'react-router-dom'
export default function Home () {
	return (
		<div>
			<h2>home内容</h2>
			<div className='container border text-center'>
				<div className="row">
					<div className="col-2 list-group-item">
						<NavLink to='news'>News</NavLink>
					</div>
					<div className="col-2">
						<NavLink to='message'>Message</NavLink>
					</div>
				</div>
				<div className="row">
          {/*路由渲染位置*/}
					<Outlet />
				</div>
			</div>
		</div>
	)
}
- Outlet 组件用于指定组件渲染位置 (区别于{elements},Outlet 用于嵌套,类似于 Vue 的 RouterView)
- @6 版本里子组件路径可以不用加父组件路径了
path: 'news':react 会自动加上父组件路径path: '/news':不能这样写,不然路径会变成...8080/newspath: '/home/news':也是正确
不用路由表的嵌套(一般不用)
<Routes>
  <Route to='/home'>
    <Route to='news'></Route>
  </Route>
</Routes>
9.8 路由传参
在 @5 版本,路由传参通过类组件实现,组件会收到 3 个 props 属性,分别是 location,match,history
通过 params 传递参数在 props.match.params 中以对象方式存在
通过 query 传递参数在 props.location.search 中以字符串方式存在
通过 state 传递参数在 props.location.state 中以什么存在忘了,用时自己查
但是 @6 版本不行咯,为了拥抱 Hooks,直接就砍掉了
9.8.1 params 传参
routes/index.js
{
  path: 'news',
  element: <News />,
  children: [
    {
      path: 'detail/:id/:name/:content',
      element:<Detail/>
    }
  ]
}
News.jsx (传递参数组件)
import React, { useState } from 'react'
import { Link, Outlet } from 'react-router-dom'
export default function News () {
	const [data] = useState([
		{ id: '001', name: '消息一', content: '消息一的内容' },
		{ id: '002', name: '消息二', content: '消息二的内容' },
		{ id: '003', name: '消息三', content: '消息三的内容' }
	])
	return (
		<div>
			<div>
				{data.map(m => {
					return (
						<div key={m.id}>
							<Link to={`detail/${m.id}/${m.name}/${m.content}`}>{m.name}</Link>
						</div>
					)
				})}
			</div>
			<hr />
			<div>
				<Outlet />
			</div>
		</div>
	)
}
Detail.jsx (接收参数组件)
import React from 'react'
import { useParams } from 'react-router-dom'
export default function Detail () {
  // /useParams()返回对象
	const {id,name,content} = useParams()
	return (
		<div>
			<ul>
			<li>{id}</li>
			<li>{name}</li>
			<li>{content}</li>
			</ul>
		</div>
	)
}
接收参数还可以用 useMatch() ,但用的不多
const x = useMatch()
数据在 x.params 中
9.8.2 search 传参
routes/index.js
{
  path: 'message',
  element: <Message />,
  children: [
    {
      path: 'detail',//无需占位
      element:<Detail/>
    }
  ]
}
Message.jsx (传递参数组件)
<Link to={`detail?id=${m.id}&name=${m.name}&content=${m.content}`}>{m.name}</Link>
Detail.jsx (接收参数组件)
import React from 'react'
import { useSearchParams, useLocation } from 'react-router-dom'
export default function Detail () {
  //useSearchParams() 返回数组
	const [search,setSearch] = useSearchParams()
	const id = search.get('id')
	const name = search.get('name')
	const content = search.get('content')
  //useLocation() 获得search参数(不常用,一般用来获取state参数)
  console.log(useLocation())
  //setSearch() 可修改带来的参数 同时改变地址栏
  //setSearch('id=x&name=x&content=x')
	return (
		<div>
			<ul>
			<li>{id}</li>
			<li>{name}</li>
			<li>{content}</li>
			</ul>
		</div>
	)
}
useLocation() 返回值

9.8.3 state 传参
routes/index.js
{
  path: 'message',
  element: <Message />,
  children: [
    {
      path: 'detail',//无需占位
      element:<Detail/>
    }
  ]
}
Message.jsx (传递参数组件)
<Link to='detail' state={{ ...m }}>{m.name}</Link>
Detail.jsx (接收参数组件)
import React from 'react'
import { useLocation } from 'react-router-dom'
export default function Detail () {
	const { state: { id, name, content } } = useLocation()
	return (
		<div>
			<ul>
				<li>{id}</li>
				<li>{name}</li>
				<li>{content}</li>
			</ul>
		</div>
	)
}
9.9 编程式路由
9.9.1 基础使用 useNavigate
import React from 'react'
import { useNavigate } from 'react-router-dom'
export default function Header () {
	const navigate = useNavigate()
	const toAbout = () => {
		navigate('/about', {
			replace: false,
			state: {
				msg: 'xxx'
			}
		})
	}
	return (
		<div className='col'>
			<h1 className='text-center'>Header</h1>
			<button type='button' className="btn btn-dark" onClick={toAbout}>to About</button>
			<button className="btn btn-dark" onClick={() => navigate(-1)}>back</button>
			<button className="btn btn-dark" onClick={() => navigate(1)}>forward</button>
		</div>
	)
}
@6 版本不需要用 withRouter 将一般组件变成路由组件了,只要使用 useNavigate() 就能作为路由组件
前进后退分别传参数 1,-1
9.9.2 useInRouterContext
只要被 BrowerRouter 组件所包裹的组件,此钩子返回 true 否则返回 false
9.9.3 useNavigationType
- 返回导航类型(用户是如何来到这个页面的)
- 返回值 POP(刷新页面),REPLACE,PUSH
9.9.4 useOutlet
- 返回当前组件渲染的嵌套组件
- 若还没渲染则返回 null
9.9.5 useResolvedPath
解析路径中的 path,search,hash 值
9.10 BrowserRouter 和 HashRouter 的 区别
https://juejin.cn/post/7030973301698592804
9.11 路由懒加载
fallback 指定未加载时组件
import React, { lazy, Suspense } from 'react'
import { Link, Route, Routes } from 'react-router-dom'
const Home = lazy(() => import('./pages/Home'))
const About = lazy(() => import('./pages/About'))
export default function App () {
return (
<div>
<Link to='/about'>about</Link>
<Link to='/home'>home</Link>
<div>
<Suspense fallback={<h1>Loading...</h1>}>
<Routes>
<Route path='/about' element={<About />}></Route>
<Route path='/home' element={<Home />}></Route>
</Routes>
</Suspense>
</div>
</div>
)
}
10. Antd
10.1 基础使用
- 导入包 npm i antd
- App.jsx 引入样式 import '../node_modules/antd/dist/reset.css'
- 引入要用的组件 import {Button} from 'antd'
具体使用查看文档
10.2 按需引入
@5 版本采用 CSS-in-JS ,自带按需引入
@4 版本看文档
10.3 自定义主题
看文档
11. redux
注意与 react-redux 的区别
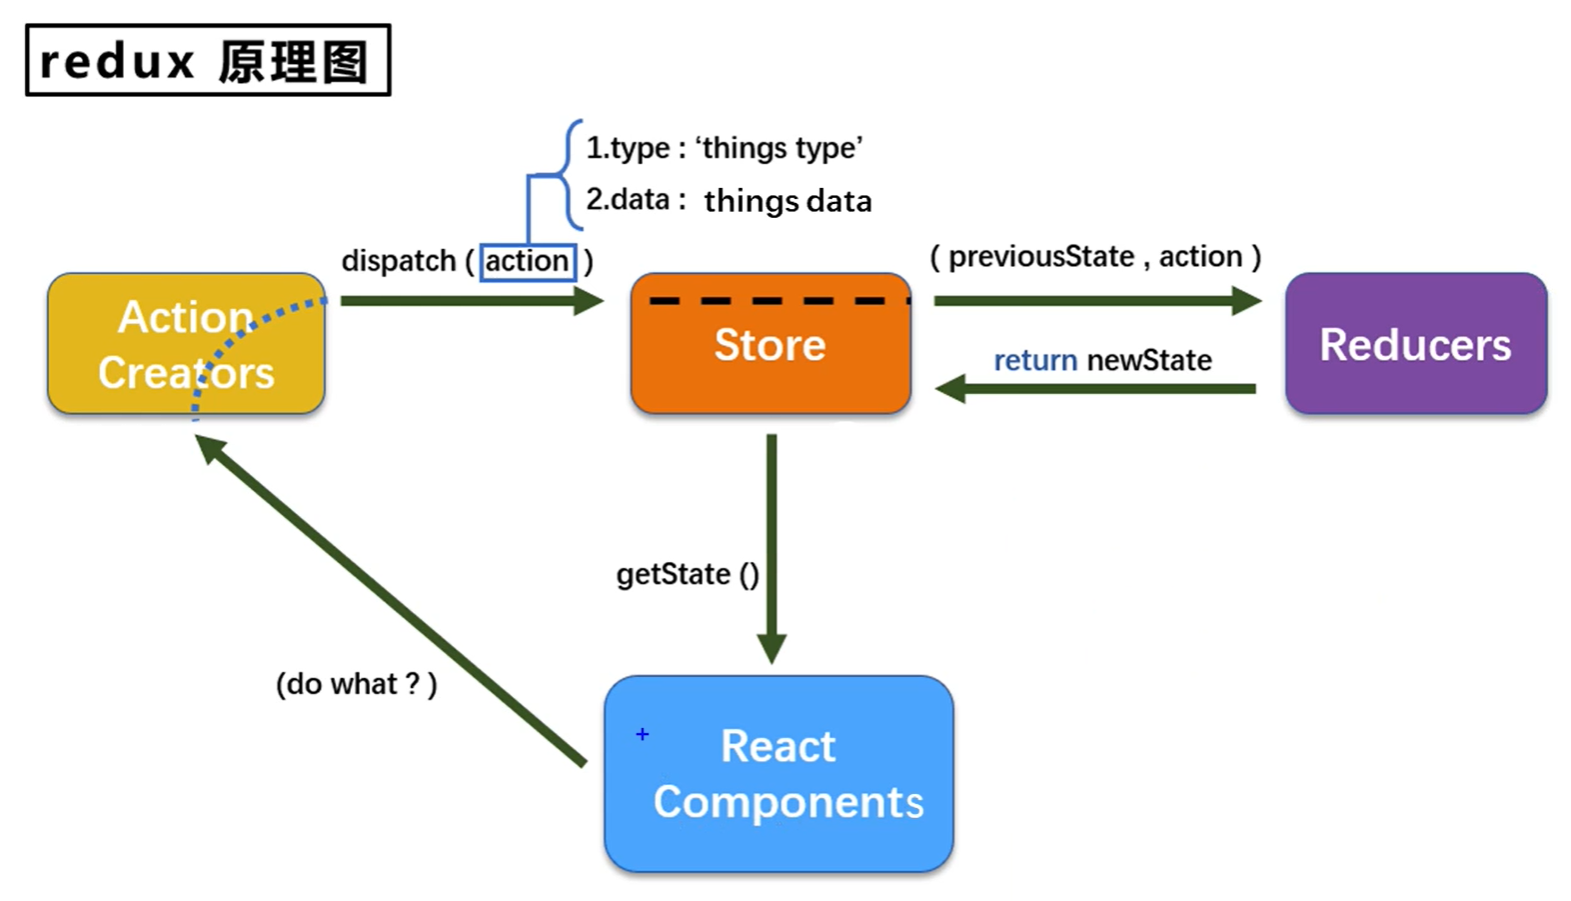
11.1基础使用
- redux/constant.js
/*
	全局变量
*/
export const INCREMENT = 'increment'
export const DECREMENT = 'decrement'
- redux/count_reducer.js
/*
	对状态进行操作
*/
import { INCREMENT, DECREMENT } from "./constant"
/* 初始状态 */
const initState = 0
export default function countReducer (preStore = initState, action) {
	const { type, data } = action
	switch (type) {
		case INCREMENT:
			return preStore + data
		case DECREMENT:
			return preStore - data
		default:
			return preStore
	}
}
- redux/countAction.js
/*
	创建action对象
*/
export const createIncrement = data => ({ type: 'increment', data })
export const createDecrement = data => ({ type: 'decrement', data })
/* 创建异步action对象 (其实就是异步里面调同步)*/
export const createAsyncIncrement = (data, time) => {
	/* dispatch如果接收到一个函数,那么store会调用它,并默认给他传递一个dispatch参数 */
	return (dispatch) => {
		setTimeout(() => {
      /* 派发同步 action */
			dispatch(createIncrement(data))
		}, time)
	}
}
- redux/store.js
/* applyMiddleware 使用中间件 */
import { createStore, applyMiddleware } from 'redux'
/*
**安装包 redux-thunk
**按需要安装它,没有异步需求就不需要
*/
//引入可以使用异步 action 的中间件,有了它 dispatch 就可以接收一个函数
import thunk from 'redux-thunk'
import countReducer from './count_reducer'
export default createStore(countReducer, applyMiddleware(thunk))
- Count组件
import React, { useState, useEffect } from 'react'
import store from '../../redux/store'
import { createIncrement, createAsyncIncrement } from '../../redux/countAction'
export default function Count () {
	const [update, setUpdate] = useState(true)
	const increment = () => {
    /* 派发操作 */
		store.dispatch(createIncrement(1))
		setUpdate(!update)
	}
	useEffect(() => {
		/*
		**只要store里的数据发生了变化,就会执行回调
		**就和发布订阅一样
		*/
		store.subscribe(() => {
			setUpdate(!update)
		})
	})
	const add_async = () => {
		store.dispatch(createAsyncIncrement(2, 1000))
	}
	return (
		<div>
			<h1>Count: {store.getState()}</h1>
			<button onClick={increment}>increment</button>
			<button onClick={decrement}>decrement</button>
			<button onClick={add_odd}>add_odd</button>
			<button onClick={add_async}>add_async</button>
		</div>
	)
}
如有异步需求需要创建异步 action ,要用到中间件 redux-thunk
12. react-redux
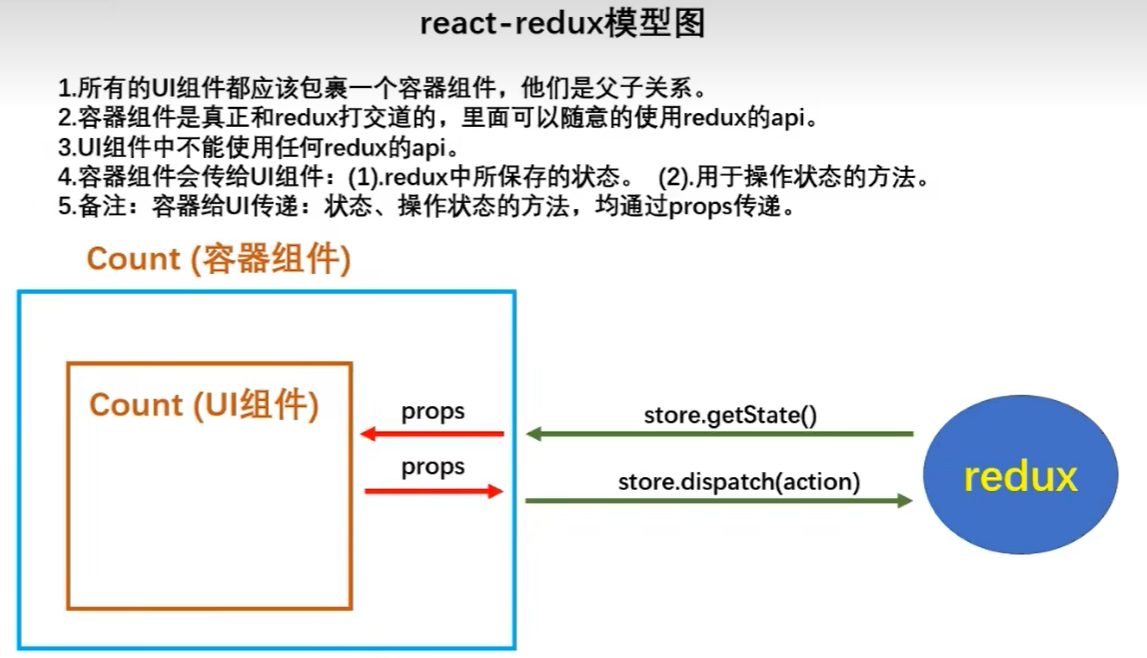
12.1 基本使用
安装依赖包 react-redux
redux 文件夹衔接上文
- src/containers/Count/index.jsx 容器组件
import CountUI from "../../components/Count"
import { connect } from "react-redux"
import { createIncrement, createAsyncIncrement } from "../../redux/countAction"
//返回一个对象,对象的 key 映射为 UI组件的 props 的 key
//自动传入一个参数,即状态 store.getState()
function mapStateToProps (state) {
	return { count: state }
}
//返回一个对象,对象的 key 映射为 UI组件的 props 的 key
//自动传入一个参数,即派发函数 store.dispatch
function mapDispatchToProps (dispatch) {
	return {
		increment: (num) => {
			dispatch(createIncrement(num))
		},
		asyncIncrement: (num, time) => {
			dispatch(createAsyncIncrement(num, time))
		}
	}
}
//connect 接收两个参数
//第一个用来映射状态,第二个用来映射操作状态的方法
//connect 返回一个函数,用于连接 UI 组件(传递的参数即连接的UI组件)
//最后返回一个容器组件
export default connect(mapStateToProps, mapDispatchToProps)(CountUI)
- components/Count/index.jsx UI组件
import React, { } from 'react'
export default function Count (props) {
	const increment = () => {
		props.increment(1)
	}
	const decrement = () => { }
	const add_odd = () => { }
	const add_async = () => {
		props.asyncIncrement(1, 1000)
	}
	return (
		<div>
			<h1>Count: {props.count}</h1>
			<button onClick={increment}>increment</button>
			<button onClick={decrement}>decrement</button>
			<button onClick={add_odd}>add_odd</button>
			<button onClick={add_async}>add_async</button>
		</div>
	)
}
- App.jsx
import React, { useState, useEffect } from 'react'
import Count from './containers/Count'
import store from './redux/store'
export default function App () {
  const [state, setState] = useState(true)
  useEffect(() => {
    store.subscribe(() => {
      setState(!state)
    })
  })
  return (
    <div>
      <Count store={store} />
    </div>
  )
}
store 不是在容器组件中引入,而是通过 props 传入
12.2 简写 mapDispatchToProps
import CountUI from "../../components/Count"
import { connect } from "react-redux"
import { createIncrement, createAsyncIncrement } from "../../redux/countAction"
function mapStateToProps (state) {
	return { count: state }
}
// react-redux 会自动派发
const mapDispatchToProps = {
	increment: createIncrement,
	asyncIncrement: createAsyncIncrement
}
export default connect(mapStateToProps, mapDispatchToProps)(CountUI)
12.3 优化 store
- 不再需要监听 store
用了 react-redux 就不用再用 store.subcribe(()=>{}) 监听 store 数据的改变了
他会在 connect 中自动监测数据改变从而更新组件
- Privder 组件
处于 Provider 组件内的容器组件会自动传入 store
App.jsx
import React, { } from 'react'
import Count from './containers/Count'
import store from './redux/store'
import { Provider } from 'react-redux'
export default function App () {
  return (
    <div>
      <Provider store={store}>
        <Count />
      </Provider>
    </div>
  )
}
12.4 合并 UI 组件与容器组件
因为 UI 组件和容器组件一一对应,当需要和 store 打交道的组件多了,那么组件系统会很庞大
src/containers/Count.jsx 容器组件
import { connect } from "react-redux"
import { createIncrement, createAsyncIncrement } from "../../redux/countAction"
import React, { } from 'react'
//UI 组件
function Count (props) {
  const increment = () => {
    props.increment(1)
  }
  const decrement = () => { }
  const add_odd = () => { }
  const add_async = () => {
    props.asyncIncrement(1, 1000)
  }
  return (
    <div>
      <h1>Count: {props.count}</h1>
      <button onClick={increment}>increment</button>
      <button onClick={decrement}>decrement</button>
      <button onClick={add_odd}>add_odd</button>
      <button onClick={add_async}>add_async</button>
    </div>
  )
}


/* 容器组件 */

//返回一个对象,对象的 key 映射为 UI组件的 props 的 key
//自动传入一个参数,即状态 store.getState()
function mapStateToProps (state) {
  return { count: state }
}
//返回一个对象,对象的 key 映射为 UI组件的 props 的 key
//自动传入一个参数,即派发函数 store.dispatch
// react-redux 会自动派发
const mapDispatchToProps = {
  increment: createIncrement,
  asyncIncrement: createAsyncIncrement
}
//connect 接收两个参数
//第一个用来映射状态,第二个用来映射操作状态的方法
//connect 返回一个函数,用于连接 UI 组件(传递的参数即连接的UI组件)
//最后返回一个容器组件
export default connect(mapStateToProps, mapDispatchToProps)(Count)
12.5 合并 reducer ,多个组件间用 react-redux 通信
目录结构变更
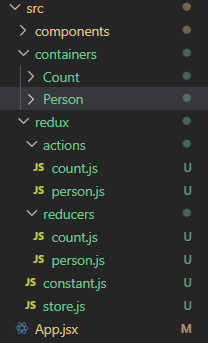
- store.js变更
/* combineReducers 合并所有reducer */
import { createStore, applyMiddleware, combineReducers } from 'redux'
import thunk from 'redux-thunk'
import countReducer from './reducers/count'
import personReducer from './reducers/person'
/* 前面的 store.getState('key') 就能通过 key 来取了*/
const allReducer = combineReducers({
	count: countReducer,
	persons: personReducer
})
export default createStore(allReducer, applyMiddleware(thunk))
- contant.js
/*
	全局变量
*/
export const INCREMENT = 'increment'
export const DECREMENT = 'decrement'
export const ADD_PERSON = 'add_person'
- Count容器组件
import { connect } from "react-redux"
import { createIncrement, createAsyncIncrement } from "../../redux/actions/count"
import React, { } from 'react'
//
function Count (props) {
	const increment = () => {
		props.increment(1)
	}
	const decrement = () => { }
	const add_odd = () => { }
	const add_async = () => {
		props.asyncIncrement(1, 1000)
	}
	return (
		<div>
			<h1>Count组件</h1>
			<button onClick={increment}>increment</button>
			<button onClick={decrement}>decrement</button>
			<button onClick={add_odd}>add_odd</button>
			<button onClick={add_async}>add_async</button>
			<ul>
				person组件的内容
				<hr />
				{
					props.persons.map(({ id, name, age }) => {
						return <li key={id}>name: {name} ----- age: {age}</li>
					})
				}
			</ul>
		</div>
	)
}

// 取值方式改变
function mapStateToProps (state) {
	return { count: state.count, persons: state.persons }
}
const mapDispatchToProps = {
	increment: createIncrement,
	asyncIncrement: createAsyncIncrement
}

export default connect(mapStateToProps, mapDispatchToProps)(Count)
- Person 容器组件
import React, { useRef } from 'react'
import { connect } from 'react-redux'
import { nanoid } from 'nanoid'
import { createAddPerson } from '../../redux/actions/person'
//UI 组件
function Person (props) {
	const nameNode = useRef()
	const ageNode = useRef()
	const add = () => {
		const name = nameNode.current.value
		const age = ageNode.current.value
		props.add_person({ id: nanoid(), name, age })
	}
	return (
		<div>
			<h1>person组件</h1>
			<input type="text" placeholder='name' ref={nameNode} />
			<input type="text" placeholder='age' ref={ageNode} />
			<button onClick={add}>添加</button>
			<h4>Count组件的值:{props.count}</h4>
		</div>
	)
}
// 暴露容器组件
export default connect(
	state => ({ count: state.count }),
	{
		add_person: createAddPerson
	}
)(Person)
- actions/person.js
import { ADD_PERSON } from "../constant"
export const createAddPerson = personObj => ({ type: ADD_PERSON, data: personObj })
- reducers/person.js
import { ADD_PERSON } from "../constant"
const initState = [
	{
		id: '0-1',
		name: 'xz',
		age: 12
	},
	{
		id: '0-2',
		name: '李易峰',
		age: 34
	}
]
export default function personReducer (preState = initState, action) {
	const { type, data } = action
	switch (type) {
		case ADD_PERSON:
			return [data, ...preState]
		default:
			return preState
	}
}
效果
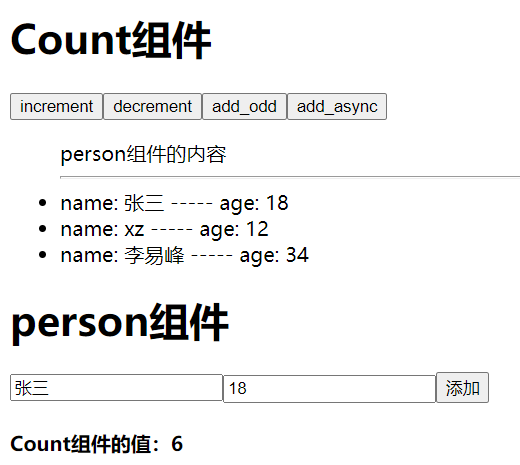
12.6 纯函数
- 相同的输入,永远得到相同的输出
这句话可不能理解为参数与返回值相同,这句话的意思是:一个函数,传递给他一个参数,不管你调用多少遍,他的输出永远都是一样的(这里指的是输入输出的值,引用不同值相同也算输入输出一样)
比如 reducer 函数,prestate 与 action 两个值永远不变的话,那么它的返回值永远不变
- 不对外部产生影响
这个便好理解,比如操作 dom,发起请求,改了全局变量...这些都是对外部产生影响,(这些应该再action中处理)
都符合这两个条件便是纯函数
例子,一个 reducer 函数
const initState = [{id: '0-1',name: 'xz',age: 12}]
export default function personReducer (preState = initState, action) {
	const { type, data } = action
	switch (type) {
		case 'demoAction':
			preState[0].age = data //这里修改了preState,由于preState是一个引用,所以这样就不是纯函数了
      /* 关于react-redux有时状态改变了却不响应的原因 */
			return preState //这里是返回了preState,但是react并不会更新,因为preState的引用是没改变的,任然指向原来的对象,react便是不认为数据发生了变化
			//return [...preState] //这样返回新的引用这样react-redux才认为状态更新了
		default:
			return preState
	}
}
react-redux 默认会进行一下浅比较,来决定是否更新页面
12.7 react-redux 开发者工具
- 浏览器安装插件 Redux DevTools
- 项目安装依赖包 redux-devtools-extension
- store.js
import { createStore, applyMiddleware, combineReducers } from 'redux'
import thunk from 'redux-thunk'
import countReducer from './reducers/count'
import personReducer from './reducers/person'
/* 导入 redux-devtools-extension */
import { composeWithDevTools } from 'redux-devtools-extension'
/* 前面的 store.gteState('key') 就能通过 key 来取了*/
const allReducer = combineReducers({
	count: countReducer,
	persons: personReducer
})
/* 插件作为 composeWithDevTools 的参数 */
export default createStore(allReducer, composeWithDevTools(applyMiddleware(thunk)))
12.8 简化
再redux/reducers下创建一个index.js文件用于合并reducer
index.js
/* 用于合并reducer */
import { combineReducers } from 'redux'
import countReducer from './count'
import personReducer from './person'
/* 前面的 store.gteState('key') 就能通过 key 来取了*/
export default combineReducers({
	count: countReducer,
	persons: personReducer
})
store.js
/* applyMiddleware 使用中间件 */
/* combineReducers 合并所有reducer */
import { createStore, applyMiddleware } from 'redux'
/*
**安装包 redux-thunk
**按需要安装它,没有异步需求就不需要
*/
//引入可以使用异步 action 的中间件,有了它 dispatch 就可以接收一个函数
import thunk from 'redux-thunk'

/* 导入 redux-devtools-extension */
import { composeWithDevTools } from 'redux-devtools-extension'

import reducers from './reducers'

export default createStore(reducers, composeWithDevTools(applyMiddleware(thunk)))
13 打包
- 打包后 serve build 快速以 build 文件夹为根目录开启一台服务器
- 打包后的文件直接打开不能运行,因为直接打开是用的 file 协议,打包好的路径格式默认为 http 协议下的请求资源格式 (但是把 index.html 下的
/ 开头资源路径改成 ./ 就能正常打开)
14 Hooks
以后都用这个喽,类组件少用啦
14.1 useState
import React, { useState } from 'react'

export default function App () {
  const [count, setCount] = useState(0)
  const add = () => {
    /* 第一种 */
    //setCount(count + 1)
    /* 第二种 */
    setCount(count => count + 1)
    console.log(count) // 1
  }
  return (
    <div>
      <h1>count: {count}</h1>
      <button onClick={add}>ADD</button>
    </div>
  )
}
与类组件的相比,useState 触发的更新是同步的,而类组件中 this.setState() 方法是同步的,但触发的更新是异步的
使用哪种方法依据:
- 改变依赖原状态用
setCount(coun => count + 1)
- 不依赖原状态用
setCount(newCount)
为什么 setCount() 后重新执行了 App() ,但是 const [count, setCount] = useState(0)这句代码不重新执行能,因为 react 底层做了处理,据说是单例模式,后续再去研究吧 ❓
14.2 useEffect
useEffect 回调执行时机
- 组件挂载时
- 监听的状态改变后
useEffect 组成
- 第一个回调用来做请求,定时器...等副作用功能
- 第一个回调的返回值作为组件卸载时的回调,用于关闭定时器,取消订阅...
- 第二个参数表示监听的状态集,如果不写表示监听所有状态
import React, { useState, useEffect } from 'react'
import { root } from './index'
export default function App () {
  const [count, setCount] = useState(0)
  useEffect(() => {
    const timer = setInterval(() => {
      setCount(count => count + 1)
    }, 1000)
    return () => {
      clearInterval(timer)
    }
  }, [])
  const unmount = () => {
    root.unmount()
  }
  return (
    <div>
      <h1>count: {count}</h1>
      <button onClick={unmount}>卸载组件</button>
    </div>
  )
}
14.3 useRef
import React, { useRef } from 'react'
import { root } from './index'
export default function App () {
  const node = useRef()
  const log = () => {
    console.log(node.current.value)
  }
  return (
    <div>
      <input type="text" ref={node} />
      <button onClick={log}>alert</button>
    </div>
  )
}
14.4 Fragment
import React, { Fragment } from 'react'
import { root } from './index'
export default function App () {
  return (
    <Fragment key={1} children={<h1>优先级 2 </h1>}>
      <h1>优先级 1 </h1>
    </Fragment>
  )
}
他与 <></> 有所区别,它可以传 key 值,当用到遍历时就很有用了,还有他可以指定 children 属性,如果 Fragment 标签内部没有写其他内容,那他的内容就会是 children
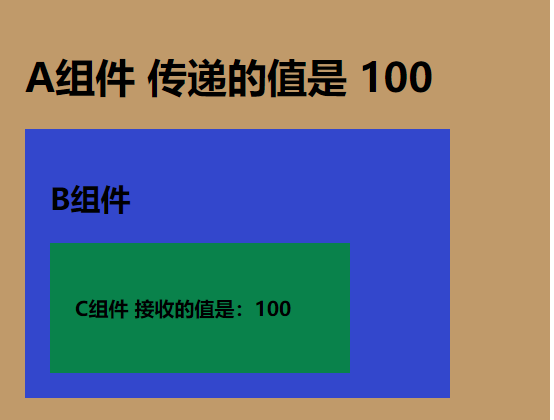
14.5 createContext 生产者-消费者模式
用于祖组件给孙孙孙...组件传值
import React, { Component, createContext } from 'react'
import './index.css'
//创建 context 对象
const MyContext = createContext()
// Provider 组件用来传递 ,Consumer用来接收 (类组件还有另一种方式接收)
const { Provider, Consumer } = MyContext
export default class A extends Component {
	render () {
		return (
			<div className='A'>
				<h1>A组件 传递的值是 100</h1>
				{/* 只能用 value 属性传值 */}
				<Provider value={100}>
					<B />
				</Provider>
			</div>
		)
	}
}
//B 组件
class B extends Component {
	render () {
		return (
			<div className='B'>
				<h2>B组件</h2>
				<C />
			</div>
		)
	}
}
/* 这个接收方式只适用于类组件 */
/* class C extends Component {
	// 必须用 static
	// 声名 C 属于这个上下文
	// 声名了之后才可以通过 this.context 接收
	static contextType = MyContext
	render () {
		return (
			<div className='C'>
				<h4>C组件 接收的值是:{this.context}</h4>
			</div>
		)
	}
} */
/* 这个接收方式适用于类组件与函数组件 */
function C () {
	return (
		<div className='C'>
			<h4>
				C组件 接收的值是:<Consumer>{value => value}</Consumer>
			</h4>
		</div>
	)
}
/* 函数组件还有一种接收方法 const value = useContext(MyContext) */
其实吧,这个一般用来封装插件,不用来开发写
react-redux 的 Provider 组件就是这个原理
14.6 useLayoutEffect
与 useEffect 的不同点
- 执行时机不同。useLayoutEffect 在 DOM 更新之后执行;useEffect 在 render 渲染结束后执行。执行示例代码会发现 useLayoutEffect 永远比 useEffect 先执行,这是因为 DOM 更新之后,渲染才结束或者渲染还会结束
其他 hook 看官网吧
15 其他
15.1 PrueComponents 优化 类组件
import React, { Component, PureComponent } from 'react'
/* 解决办法 二,继承 PureComponent */
/* PureComponent原理其实也是重写 shouldComponentUpdate ,但是他只在里面进行了浅比较
也就是说用这个方法,就算状态改变了,但是传入的引用一样,那么不会调用 render
比如 this.state(this.state)
*/
export default class Demo extends PureComponent {
state = { count: 0 }
handle = () => {
this.setState({ count: 0 })//状态并没有改变,但是却要调用 render
}
/* 解决办法 一,重写shouldComponentUpdate */
/* shouldComponentUpdate (nextProps, nextState) {
console.log(this.state, nextState)
return nextState.count !== this.state.count
} */
render () {
console.log('@@@')
return (
<div>
count: {this.state.count}
<button onClick={this.handle}>触发</button>
</div>
)
}
}
/* 这里插播一个小知识,this.setState() 执行顺序是 先触发 shouldComponentUpdate,并将新状态传给它,通过后再改变状态,再render*/
hooks 中的 useState() 出来的操作状态的方法,默认是做了 PureComponent 组件这样的处理的,也是浅比较,意味着也不能 setObj(obj)
15.2 render Props
import React, { Component, useState } from 'react'
import './index.css'

export default class A extends Component {
	render () {
		return (
			<div className='A'>
				<h1>A组件</h1>
				<B render={(v) => <C count={v} />} />
			</div>
		)
	}
}
//B 组件
function B (props) {
	const [count, setCount] = useState(0)
	return (
		<div className='B'>
			<h2>B组件</h2>
			{props.render(count)}
		</div>
	)
}
//C 组件
function C (props) {
	return (
		<div className='C'>
			<h4>
				C组件: {props.count}
			</h4>
		</div>
	)
}
类似 vue 的插槽,比插槽底层,其实 vue 也是这样的原理
15.3 错误边界
高铁要开了,没时间写了
在生产环境有用,开发环境该报错还是报错
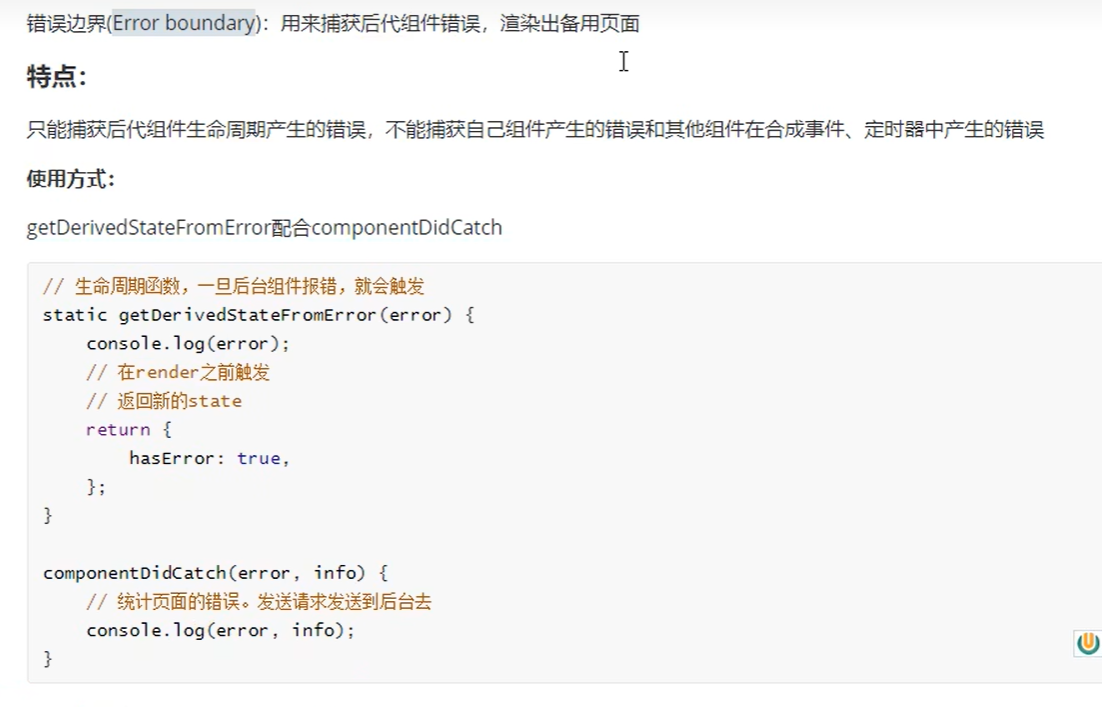


请使用 static getDerivedStateFromError() 渲染备用UI,使用componentDidCatch()打印错误信息
函数组件的错误边界百度吧,没空了❓
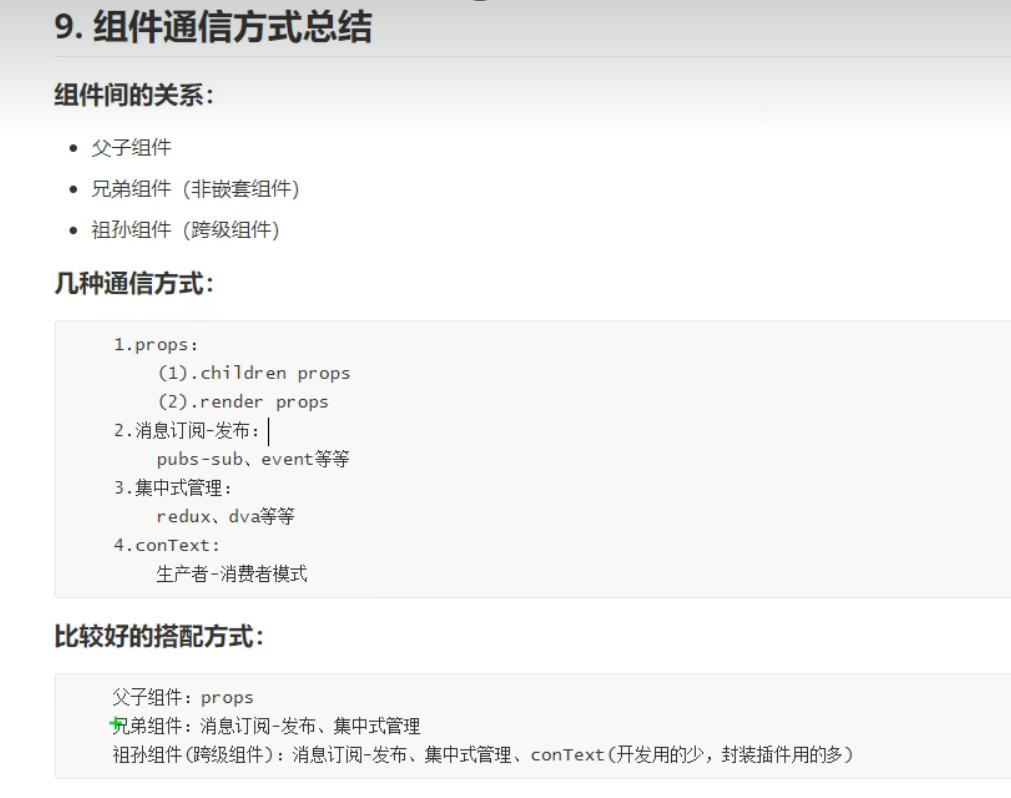
15.4 组件通信的方法
经验
1. 解构赋值连写
const that = {
	state: {
		data: 'msg'
	}
}
const { state: { data } } = that
//也可以解构赋值后重命名
const { state: { data: value } } = that
console.log(data, value) // msg msg
2. 三元连写
3. 包管理器 npm 与 yarn 最好不要混用 容易造成包丢失
4. 箭头函数返回对象
const fun = () => ({count:0})
5. 取多个节点的值
const [{ value: name }, { value: password }] = [nameNnode.current, passwordNode.current]
console.log(name, password)
规范
1. target="_blank" 要与 rel="noreferrer" 一起使用
当你使用 target="_blank" 打开一个新的标签页时,新页面的 window 对象上有一个属性 opener ,它指向的是前一个页面的 window 对象,因此,后一个新打开的页面就可以控制前一个页面了,事情就是这么的可怕。而且不管它是否跨域了,都是可以的
加入了 rel="noopener noreferrer" 属性,就会 window.opener 会为 null
2. 脚手架警告
2.1 img 要加 alt 属性
Other
1. 插件
1.1 ES7+ React/Redux/React-Native snippetsv
- rcc :jsx 类组件模板
- rfc:jsx 函数组件模板
2. 包
2.1 nanoid 生成唯一标识
import nanoid from 'nanoid'
nanoid()
2.2 prop-types 限制 props
import PropTypes from 'prop-types'
往上翻
2.3 pub-sub 消息订阅与发布
import PubSub from 'pubsub-js'
//订阅
this.getGitHubID = PubSub.subscribe('getGitHub', (_, data) => {
      this.setState({ ...data })
})
//取消订阅,一般在ComponentWillUnmount中做
PubSub.unsubscribe(this.getGitHubID)
//发布
PubSub.publish('getGitHub', { })
其他详情请见文档
2.4 react-router-dom
见路由
2.5 querystring url参数和对象之间转换
<font style="color:rgb(37, 41, 51);">querystring.stringify(obj, [seq], [eq])</font> 对象转url串
<font style="color:rgb(37, 41, 51);">querystring.parse(str, [seq], [eq], [options])</font> url串转对象
seq 是分隔符,默认是 & ,eq 是分配符(键值中间符号),默认是 = ,options 是指是大长度,默认1000
2.6 redux-thunk
2.7 redux
2.8 react-redux